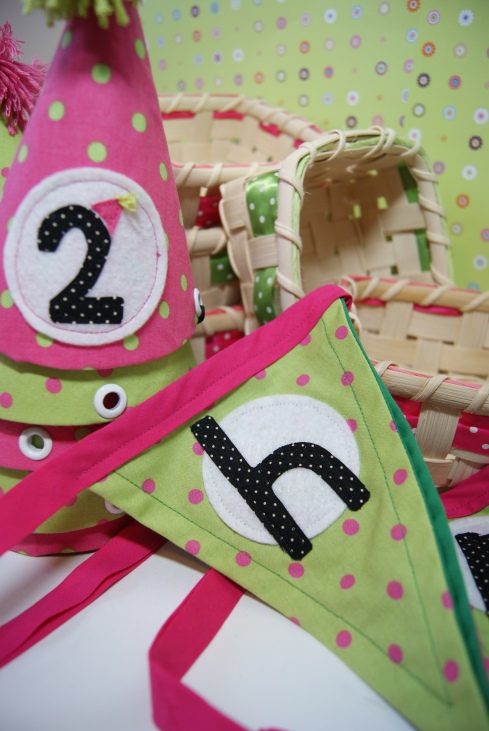
My niece is about to turn 2. In the past few months she’s started seeking out her independence. She can ask for things, she can sing her favorite song, and she can pull on her boots all by herself. On her first birthday she seemed to enjoy tearing the paper off her presents, and was definitely into gobbling up her mini sized smash cake. But this year her birthday is a little more about her and the person she is growing into.
Unfortunately she lives in another province and my husband and I can’t be there to celebrate with her like we were last year. So in order to contribute and feel like I am a part of the event I undertook some crafting to help with the party decor, hats and favors.
There are only a handful of kids invited. (Something that is recommended for a party oriented around that age), so these baskets were the perfect way to do up favors. The theme is Kimmy’s Birthday Picnic Party, and what’s a picnic without a cute little basket? Each basket will be filled with goodies (bubbles and chalk, etc) for each kid to take home and enjoy.
The best part is that the basket is part of the favor and can be reused in the child’s room or anywhere else in the house Mum and Dad see fit. Cute and eco-friendly? Perfect.
Basket Weaving 101
These are VERY simple baskets. The end result is impressive but you don’t need to worry about buying special tools or learning a textbook of jargon. There are only a few things we really need to take a look at.
Baskets can be woven out of a number of materials, the ones in this project are made of reed. It is a plant material that lives on the forest floor and can grow up to 3 feet a day. Reed is processed into different shapes/types. For this project we only need to know about three:
This is what the profile of the reed looks like. The Flat reed is used for the Stakes and Rows, the Flat Oval reed is used for the Rim and Lashing and the Round reed is used for the Twine.

You can buy each kind of reed in different sizes. For the baskets we need 5/8” Flat Reed, 1/4″ Flat Reed, #3 Round Reed, 3/8″ Flat Oval Reed, and 11/64″ Flat Oval Reed.
I purchased mine online from basketweavingsupplies.com. Usually reed comes in 1 lb bunches (priced around $7.50).
Besides the 5/8″ Flat Reed, we don’t need anywhere near that much. Fortunately basketweavingsupplies.com also sells some of the reed in yards (at a price of $.10 to $.15). It can help you save quite a bit, especially if you arn’t looking at doing other basket weaving projects.
Now that we have the basics under our belts, lets get started.
Materials:
For Each Basket You Will Need:
5/8″ Flat Reed
- 12 pieces 14 inches long
- 1 piece 4 feet long
#3 Round Reed
- 1 piece 60 inches long
1/4 ” Flat Reed
- 1 piece 20 inches long
3/8″ Flat Oval Reed
- 2 pieces 25 inches long
11/64″ Flat Oval Reed
- 1 piece 50 inches long
7/8” Ribbon
- 1 piece 22 inches long
Raffia
- 1 piece 22 inches long
Equipment
- Clothes Pins or Paper Clamps
- Strong Scissors or Wire Cutters
- Ruler or Rotary Mat
- Large Tub or Basket
- Towel
Instructions:
1. Fill your tub/basket with water. Measure and Cut all pieces of Reed. Throw the Reed in the water to soak for 5 minutes. As you take the reed out of the water to use them, quickly wipe them on the towel to dry them off a bit.
 Weave them through the vertical pieces starting at the ends. Then wiggle them down/up towards the center.
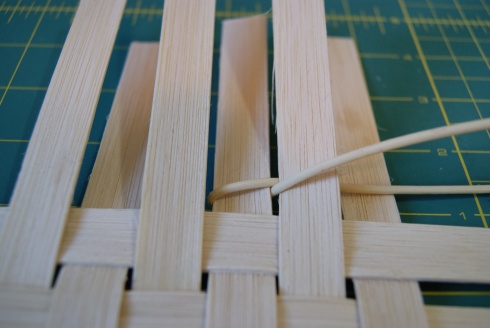 7. Bring the left strand of the #3 Round reed behind the next Stake to the right. Bring the other end of the #3 Round reed (which is now on the left) behind the next Stake to the right.
 11. Take the two Stakes in the corner and clamp together using Clothes Pins or Paper Clamps. Repeat with the other three corners.
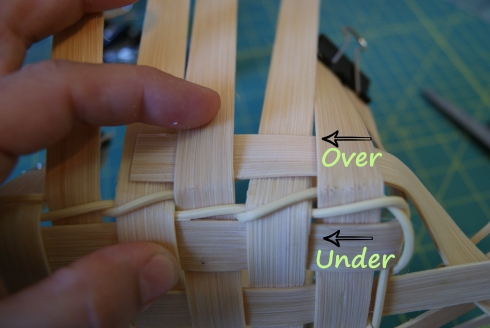 12. Using the 5/8” Flat Reed start to weave the Rows. Begin the bottom row 3/4” covering and outside Stake. Make sure you weave opposite to the pattern on the bottom. When you come to a corner remove the clamp, weave the reed in, and then put the clamp back on. Bend the reed slightly at corners to help give the basket shape.
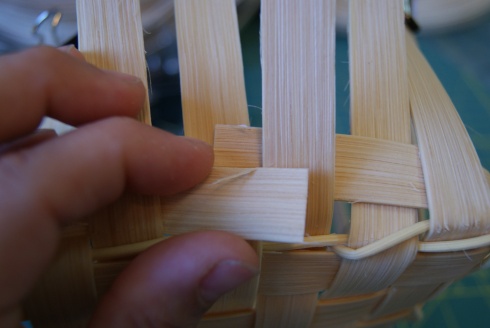 13. When you come to the end measure the reed so that it will overlap the starting point and can be tucked 3/4 behind the next Stake.
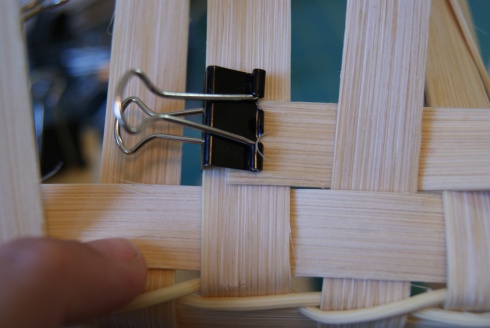 14. Repeat again with the second Row. Start and stop on the opposite side of the basket as you did with the first row. If you find the reed moves too much, clamp the starting point as well. When the second row is in place straighten the reed up, pulling the rows down to tightly butt up against the base.
 15. Cut the piece of ribbon and copying the weaving of the second row, insert it into the basket. It will sit on top of the reed of the second row.
 16. Weave the 1/4″ Flat Reed around in the same method as the 5/8″ Flat reed. Tidy up the rows and tighten up the reed. Cut each Stake that is inside flush with the 1/4″ Flat reed row (also known as the Rim Row). For each Stake that is on the outside of the basket fold it and tuck it into the first Row of reed.
 17. Clamp one end of 3/8″ Flat Oval to the inside of the basket, overlapping about half of the 1/4″ Flat Rim Row. Make sure the rounded side is facing outwards. Bend around the basket, overlap the start by 1″ and clamp together. Do the same with the other piece of 3/8″ Flat Oval on the outside of the basket, again with the rounded side of the reed facing outwards.
 18. Place the piece of Raffia between the two pieces of 3/8″ Flat Oval, covering the ends of the Stakes. Overlap the Raffia about 1″
 19. Tuck one end of the 11/64″ Flat Oval under the rim row, flat side out. Pull the 11/64″ Flat Oval up two inches between the two pieces of 3/8″ Flat Oval. Push the 11/64″ Flat Oval back down between the 2 pieces of 3/8″ Flat Oval and pull out on the inside of the basket.
 20. Lash around the basket, pulling the 11/64″ Flat Oval through the spaces between the top Row and Stakes into the basket, and then back out through the space between the next top Row and Stake. Push the end piece up through the middle of the 3/8″ Flat Oval and back down, the same as in the start.
I had the banner and hats done and off the list a few weeks ago. I followed instructions from a couple of other bloggers for the most part and added a few twists of my own.
There are a ton of tutorials out there for these, but if you are interested in the specific one I used leave a comment and I’ll put together a little post about them. (I’ve now added a post about these: Show & Tell: Birthday Bunting Banner and Party Hats)
I had to wait for the basket making supplies to come in (there was a mix up with my order) and almost didn’t get these done in time! Thankfully they are now officially Off the List and on their way to my sister’s.
You could stain the baskets a rich chocolate brown and make a custom lining with an elegant stenciled monograms. What an amazing Christmas gift that would make for my Mother-in-Law.
Is there anyone on your Christmas list that you know would love getting a handmade basket set? It’s never too early to start thinking Joel Noel. Or is that just me?


